")
As an SME in the e-commerce and logistics businesses, order tracking and fulfilment software can bite deep into your budget.
The solution? Create a logistics tracking spreadsheet in Excel and keep all costs low.
This blog will take you through creating your spreadsheet from scratch. You will also learn which column headers to use and how to automate SMS messaging from your tracking spreadsheet in Excel.
Let’s get started.
Why use a spreadsheet to manage orders and deliveries?
In addition to helping you save costs and increase your margin, here are seven reasons you should use a spreadsheet to track orders and deliveries.
Tracking orders and deliveries in a spreadsheet helps you:
- Use formulas to calculate totals, subtotals, profits, discounts, costs, and other relevant functions, which reduces manual error.
- Sort and filter data based on specific criteria like order date, customer name, or product type. This helps you make informed decisions.
- Create charts, graphs, and tables to analyse your information. You can gain insights about optimal delivery times, product demand and make relevant decisions.
- Have multiple people work on delivery tracking. Most spreadsheet software allows for collaborative work.
- Add as many columns as possible, adjust formulas and add more sheets to your requirement. This makes spreadsheets very flexible and customisable.
- Integrate your spreadsheet into e-commerce software, SMS marketing platforms, or inventory management software to reduce data entry.
- Look up historical data in a spreadsheet, adjust the scale of orders, and quickly back up a spreadsheet into the cloud.
Spreadsheets are FREE compared to other market solutions. They come incorporated with the OS, like Microsoft Office, are open source, like WPS, or can even be accessed online, like Google Sheets.
Learn 10 unique ways to use bulk SMS for logistics
Step-by-step tutorial on using a spreadsheet for managing orders and deliveries
In this tutorial, we will help you set up a logistics tracking spreadsheet in Excel.
For this tutorial, the column headers and data have been simplified. We made certain delivery assumptions, like delivery charges. And we used a delivery location city instead of an address.
Setting up the spreadsheet
Step 1: Open a clean slate to get started
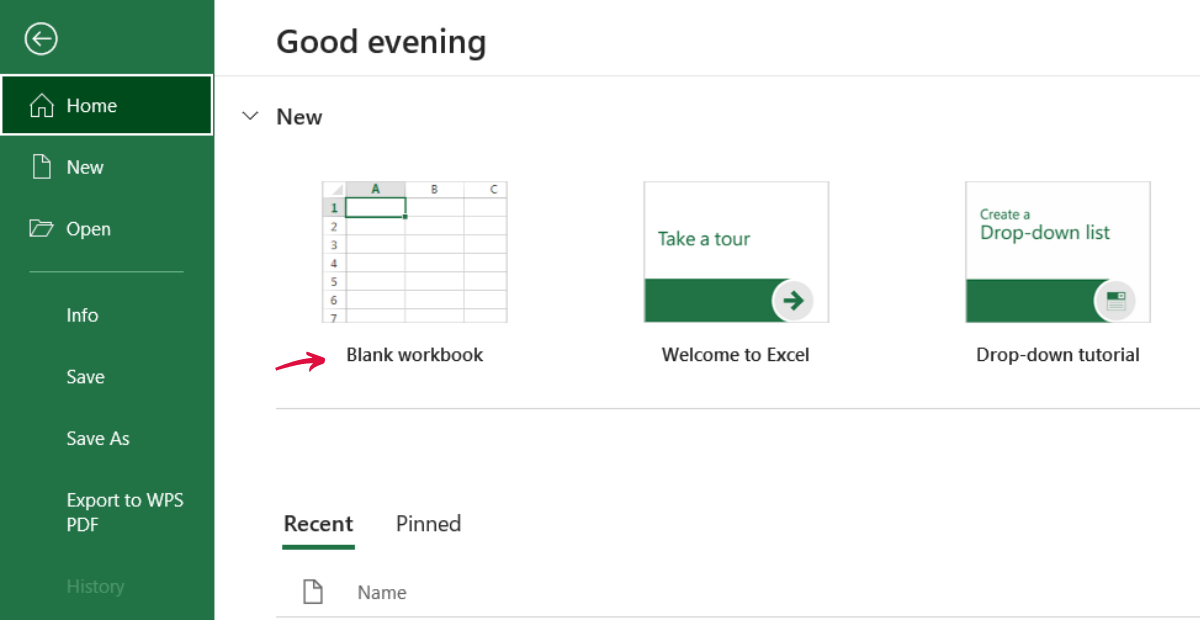
Download Excel if you don’t have it installed yet, use any open-source provider like WPS, or use Google Sheets. Open the spreadsheet software.
You should see a new Workbook when you launch the application. If you don’t, go to the “File” menu and select “New” and then “Blank Workbook”.
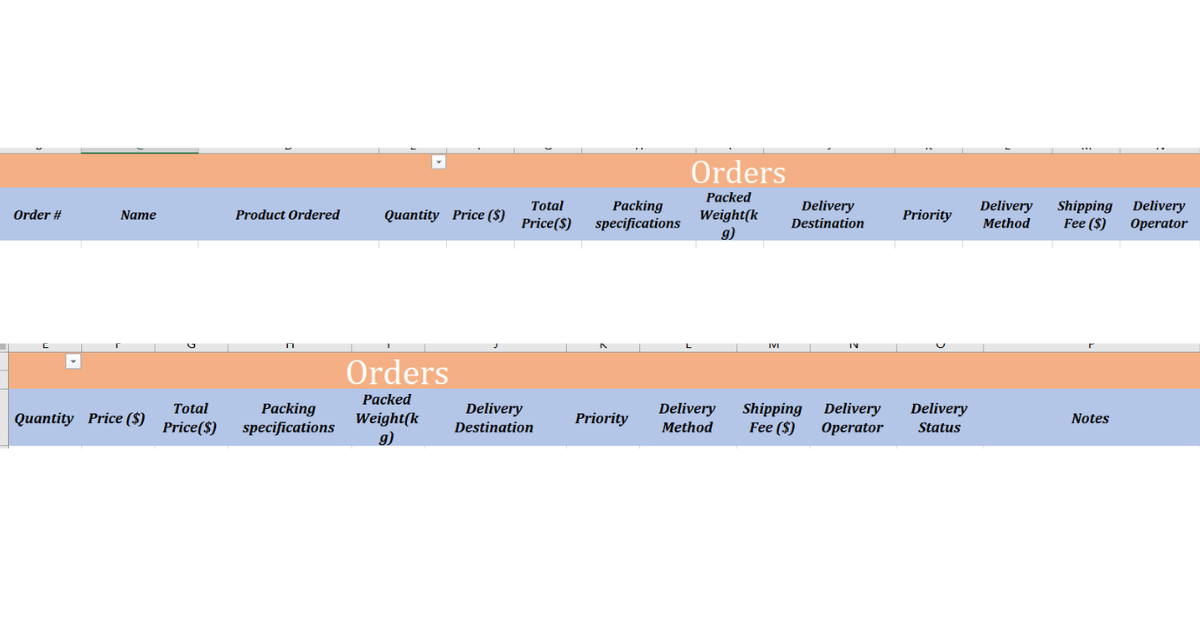
Step 2: Define your columns
This is the most essential part. Your columns will represent the different pieces of information that you want to track.
For example, if you are a small food business, you may want to list down “Food Items Ordered”, “Quantity”, “Order Instruction”, and “Delivery Time & Date” besides “Price”, “Discount”, and “Destination”.
But if you are an electronics business, consider adding “Unit Price”, “Delivery Date”, “Delivery Status”, “Tracking Number”, and “Courier Details”.
The type of data tracked by both businesses will be based on the company’s nature, the KPIs and the delivery considerations.
What does that mean?
In the food business, delivery times and customer satisfaction are paramount. But in electronics, product functionality, customisation and support are more important- which comes after order and delivery.
Information to include on your spreadsheet tracker
While you can create a sheet with pretty much any combination of data, the following list comprises headers that you should have:
- Customer Name: Provided by the customer.
- Customer Contact: Provided by the customer
- Order Number: Generated by you and shared with the customer. This number is to track the order once it leaves your premises.
- Serial number/Order ID: Generated by you but different from the order number. This number is for in-house tracking.
- Order Date: The date the customer placed the order.
- Product/Service Specifications: Include as many details as possible, including the product code of the product/service.
- Quantity: The quantity as ordered by your customer.
- Unit Price: Price of one unit of the product/service that the customer ordered.
- Total Price: Quantity multiplied by the unit price.
- Delivery Address: Provided by the customer.
- Delivery Date: The date your customer receives their order.
- Order/Delivery Status: The status of delivery from your location (for example, processing, shipped, delivered).
- Payment Status: The payment status for each order (for example, unpaid, paid, prepaid).
- Priority: This column lists the urgency status of the orders (for example, urgent, regular, and very urgent).
- Notes: Add any additional entries about the order in this column for future reference.
Here’s what it’ll look like for an electronics and food business.
For an e-commerce business, consider adding the following:
- Tracking Number: The number your logistics partner sends you to track the parcel.
- Shipping Fee: The fee your carrier will charge you to deliver to your customer.
- Shipping Method: Consider adding this column if you work with multiple shipping partners.
If you are a service-based business, consider adding the following:
- Service Time: The time you rendered the service to your customer.
- Service Provider: The name of the person who provided the service to your customer.
- Service Status: The status of the service as reported by your customer.
If you are a food order and delivery business, you can add the following for on-time delivery tracking in Excel:
- Delivery Instructions: Any additional instructions about the customer’s delivery.
- Delivery Status: This shows whether the order is still at your location or dispatched.
- Courier: The person who took the food order.
- Delivery Time: This column will be updated after delivery has been made.
Entering and tracking orders
Step 1: Input the data
Once your logistics tracking Excel spreadsheet is set up, you can input your data. Fill in the details as your orders pour in.
When you start a new order, select a new row to fill in.
For example, you can only fill in delivery information that you know, like the name of the person making the delivery, any delivery instructions you receive and the delivery address. For “Delivery Status”, you can enter “pending”. You can only provide a Delivery Time and Delivery Date when the order is received by your customer.
One way to do it is to enter the estimated delivery time and date. However, if you are not too keen on re-entering data repeatedly, we suggest you enter this data only when your customer confirms.

Step 2: Tracking order status
As you populate your logistics tracking spreadsheet, some patterns will emerge. Depending on the vocabulary you use for order status tracking, your orders may be either processing, delivered or en-route.
You can use the sort and filter tool to view orders based on specific criteria.

For example, select the “Delivery Destination” column to view orders by delivery location and click “Sort & Filter”. From the drop-down, select “Filter”. This will add a filter to the column.
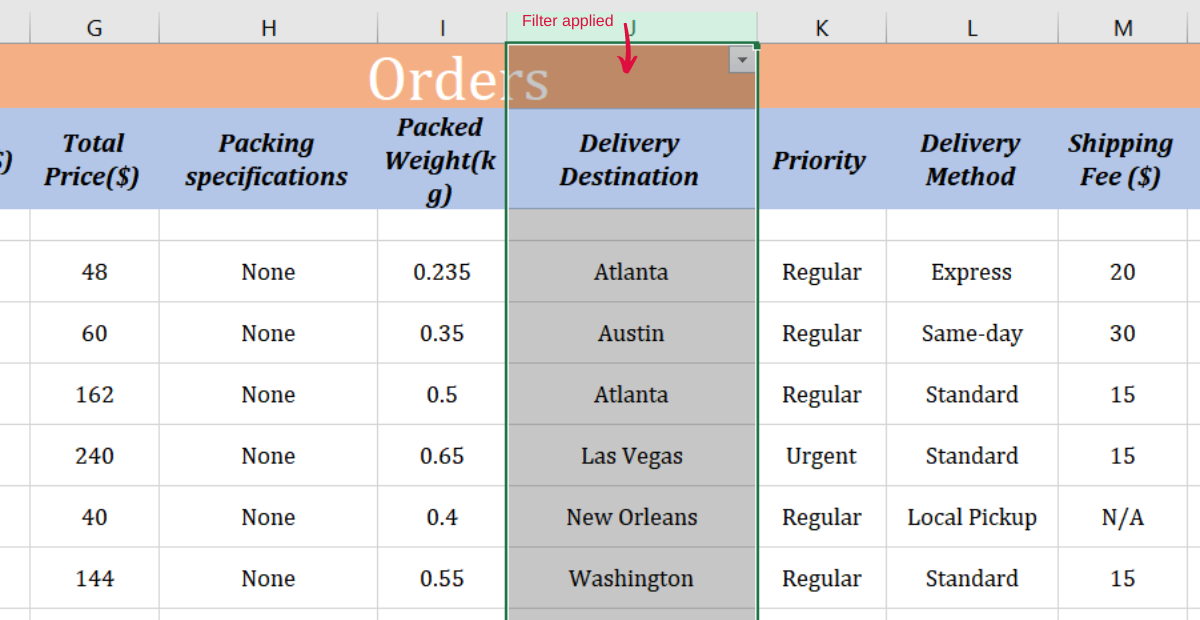
Now all you need to do is click on the small arrow in the corner and select the items you want to filter your sheet based on.
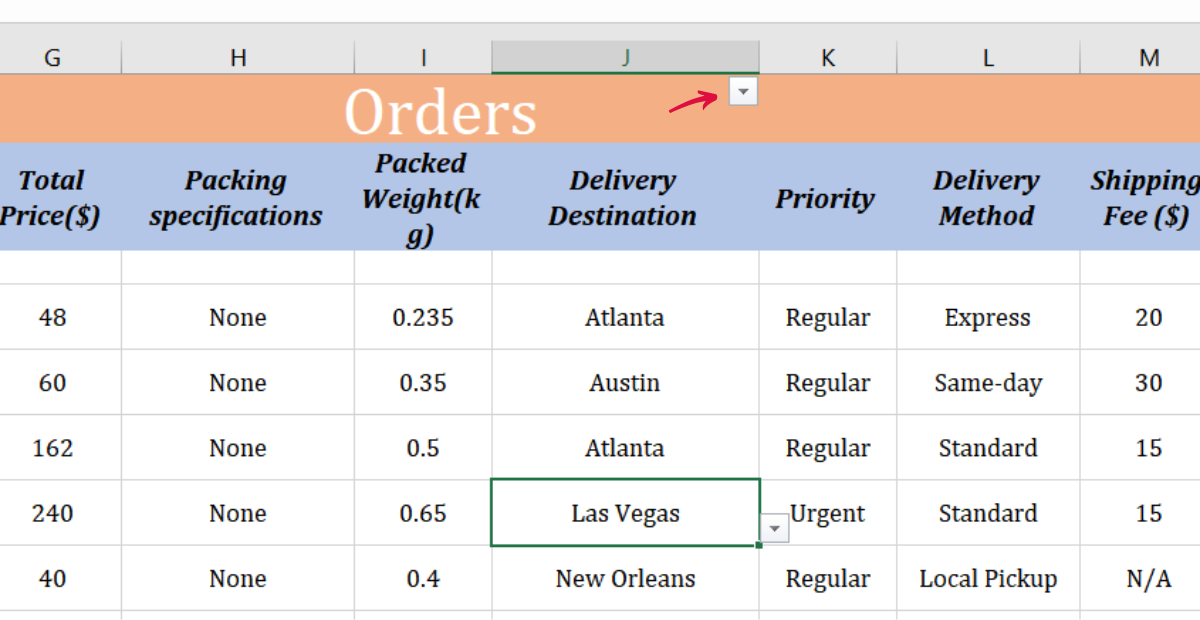

You can also select a range of values in the pop-up box to see relevant data.
Step 3: Highlight orders that require action
Use conditional formatting to see which orders need attention. Do this when you have collected sufficient data.
For example, if you have multiple orders running in a month and want to see how many have been shipped, select the entire data in the Delivery column, click “Conditional Formatting”, and select “Highlight Cell Rules”. Next, click on “Text that contains..”. In the pop-up, enter “Shipped”. Choose the formatting style and click ok.
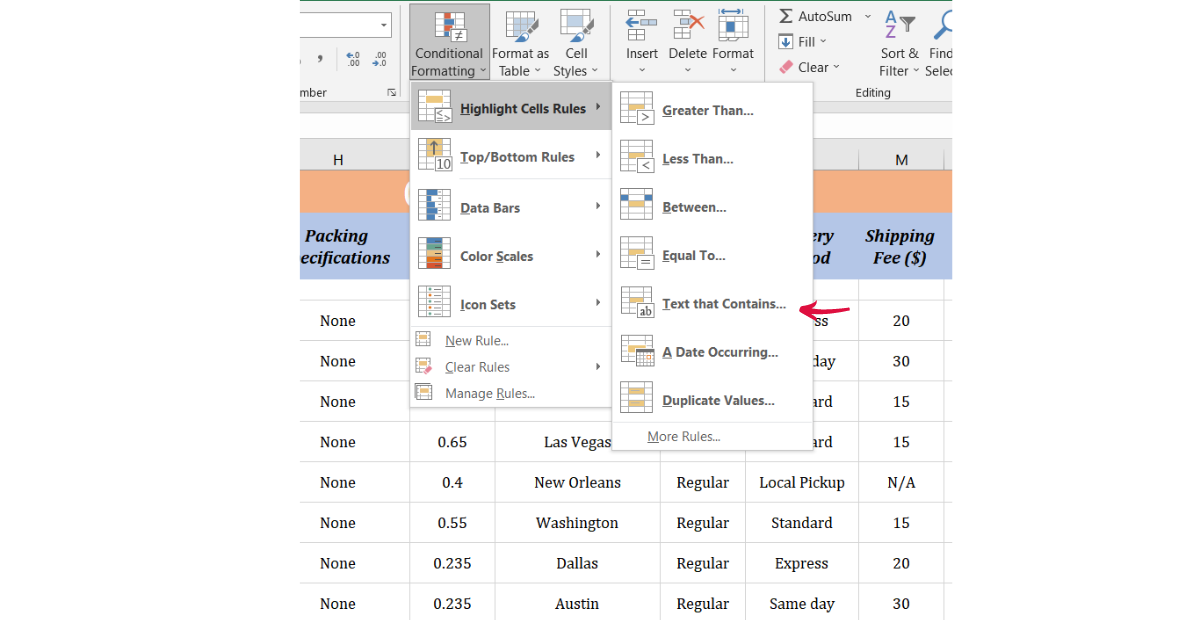
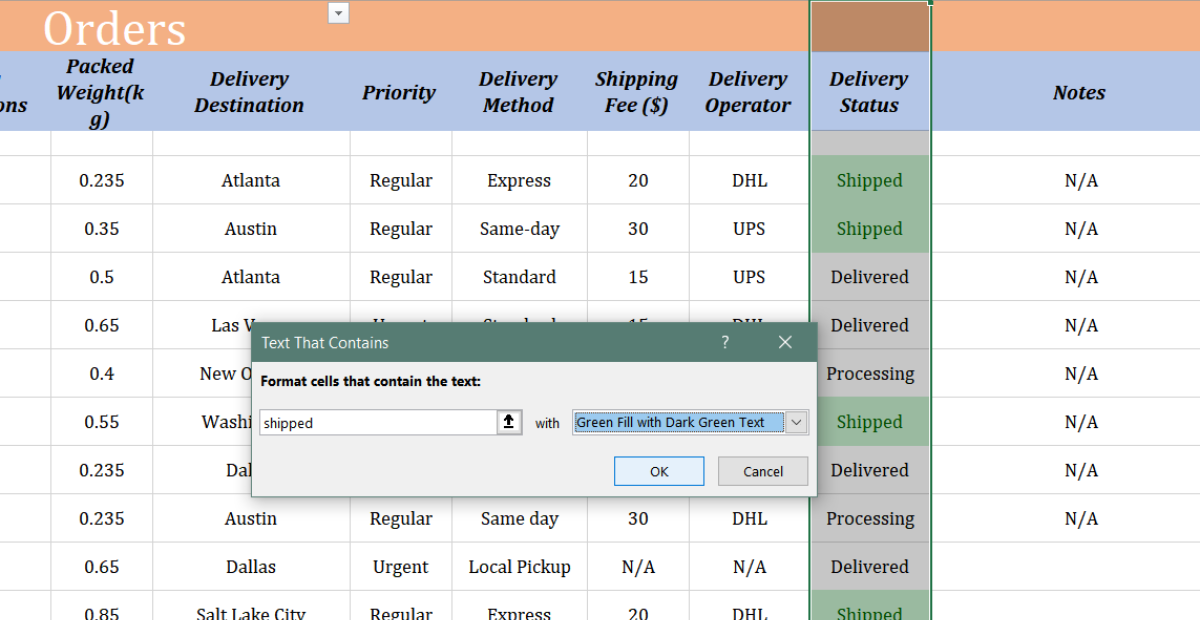
This will highlight all the shipped orders as per the formatting rule. As the Shipped orders pop up on the sheet, you can see how many orders have been shipped, the priority status and the delivery method used.

Managing e-commerce deliveries – H3
Step 1: Define and assign delivery methods
Before sending your orders, look at the available delivery options. Consider:
- Standard Shipping
- Express Shipping
- Local Pickup
- Same-day delivery
- International delivery
Once you decide on the options, connect with operators in your area and set up partnerships to help you deliver to your customer’s location.
As you go live and the orders start coming in, enter the delivery method and operator details in your sheet in separate columns.
This data will help you see which methods are commonly used by your customers and which operator is most effective for your operation.
You can use conditional formatting to highlight a combination of delivery methods and operators most suitable for your business.
Discover the 35 e-commerce tools you need to grow your business
Step 2: Tracking delivery status
Tracking delivery status is simply updating the delivery status from when the order leaves your premises to when it reaches the customer.
You can start by marking the delivery status as “pending” as the order arrives. As the order leaves your premises, you can mark the order “Enroute” or “Shipped”. As the order reaches the customer, mark the order “Delivered”.
You can use your vocabulary and add more levels.
However, if you ship more than 20 orders daily, updating each order as the status changes can be cumbersome. Set a time and update the delivery status once or twice daily to streamline the process.
Automating the process
Consider doing any or all of the following to automate your spreadsheet:
Step1: Use Excel tracking templates
Download an Excel order & delivery tracking template with predefined column headers, formatting and formulas. Use this sheet as a starting point and adjust it to create one for your business. You can get simple delivery order templates and advanced templates with data validation rules, formulas and even scripts.
Step 2: Add formulas
To quicken the pace of filling the sheet, add formulas. Use “SUM” to calculate the totals, “COUNT” to count the number of orders, and regular multiplication and division to process the data. Use “IF” to create constructs and “VLOOKUP” to look through data and analyse it.
Step3: Import data
For a business not starting from scratch, this is a good option. Fill your sheet with relevant data from the past to get started. Now apply formulas, functions, and formatting to get insights from the data.
Step 4: Use scripts (optional)
Use this automation technique if you are proficient in VBA. Write a script in VBA to automate any repetitive task and embed the code on your sheet.
For example, if you want to see reports generated on a sheet, embed a script for it on a button on your sheet. When you click the button, the script will run in the background and display the results.
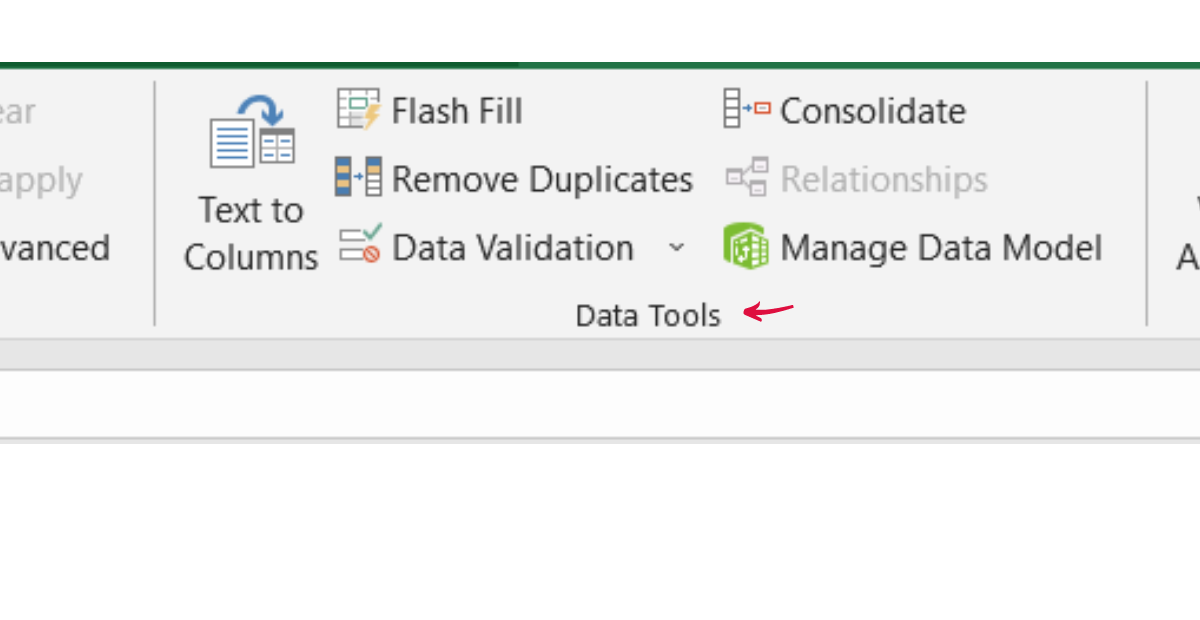
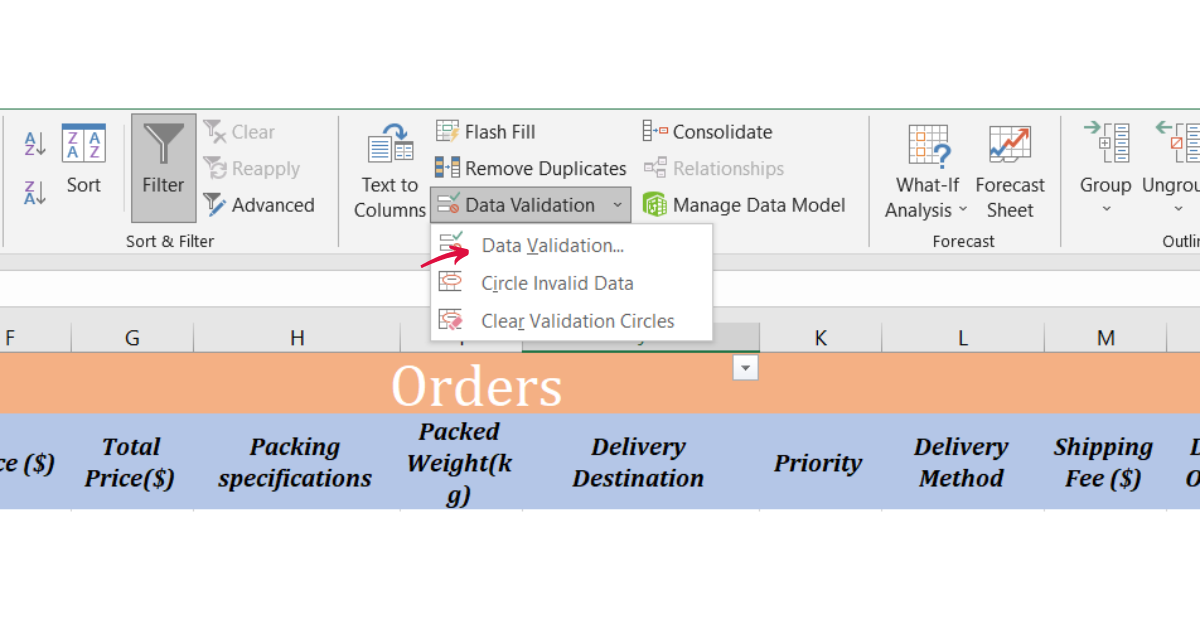
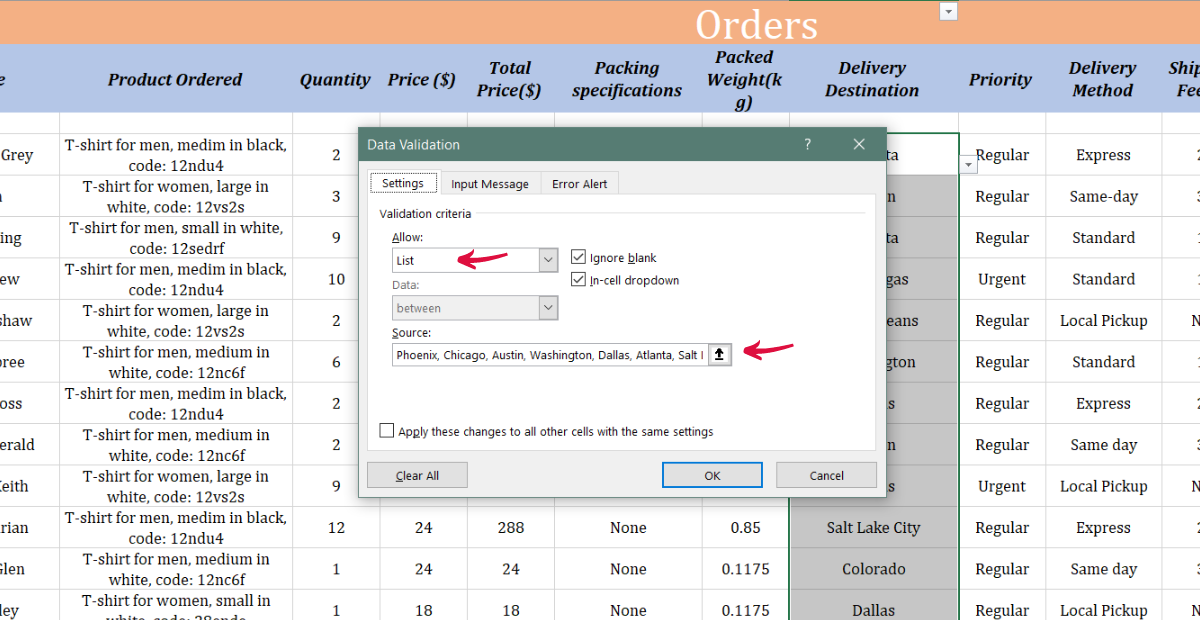
Step 5: Use the data validation tool
The data validation tool helps you set a predefined list for any cell on your sheet. Select the cells for any column with a limited set of entry values and use the tool to automate data entry.
Step 6: Use conditional formatting
As the name suggests, the tool formats data based on the conditions provided. If you wish to highlight orders by a specific customer and his order status, select the customer name column and apply conditional formatting.
Step 7: Use the SMS plugin
With an SMS plugin, you can automate sending updates about the orders from within Excel to your customers. You only need to download and install the plugin in your spreadsheet, and you’re good to go.
Let’s see how this works.
Sending orders and delivery SMS to customers directly from the sheet
For this section, we will use SMSCountry’s Excel plugin. If you don’t already have an account with SMSCountry, you can sign up or book a demo to see how it works.
Step 1: Download the plugin
Access the plugin from the SMSCountry website. Download and install the plugin.
Step 2: Open your spreadsheet
Once the file is installed, open MS Excel to reveal the plugin showing SMSCountry in the ribbon. Click on SMSCountry to see all the options.


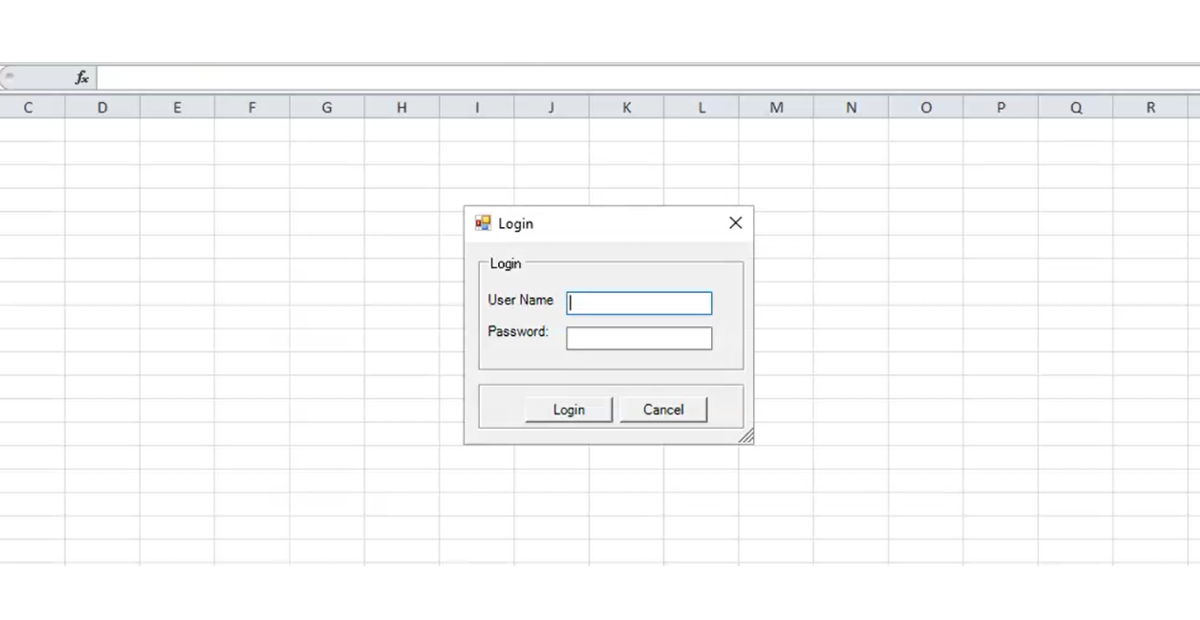
Step 3: Log in
Log in using your SMSCountry username and password. If you don’t have an account, you can sign up for free.

Step 4: Upload/Open your order and delivery sheet
You can upload data, add new data to a sheet or use an existing sheet to send SMS from Excel. Open the relevant sheet and click on “Send SMS”.
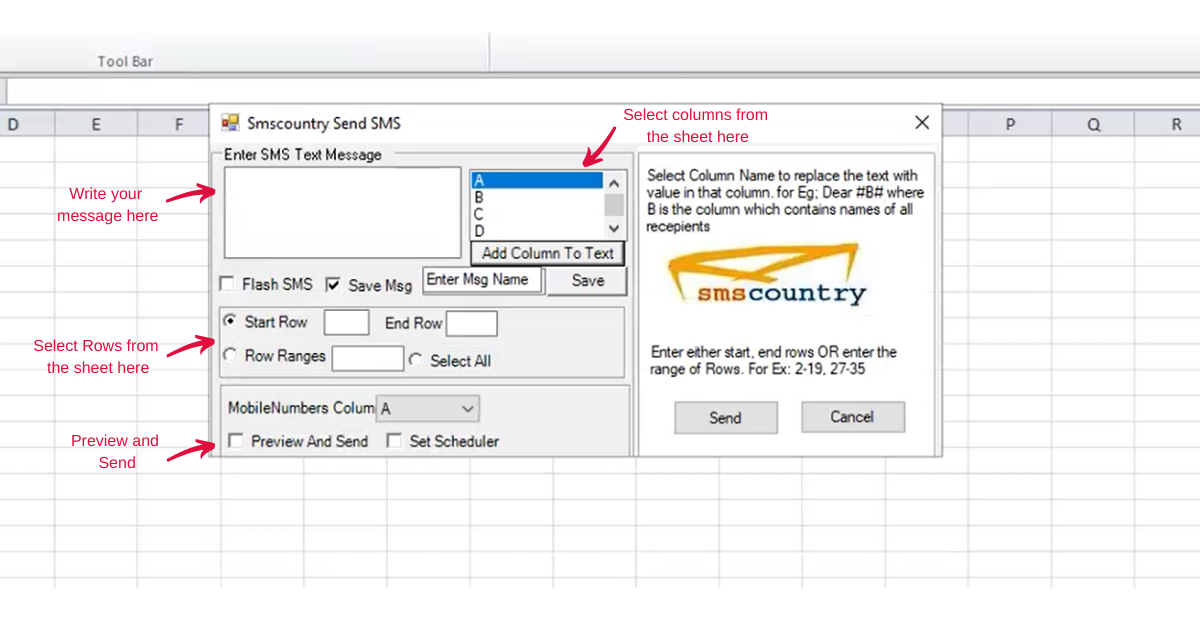
Step 5: Compose SMS
You will see a pop-up on the screen. Enter your SMS and select the fields you want to add to the SMS. You can choose one set of data or a range for your SMS. A range of fields means multiple SMS will be sent.
Select “Preview And Send” to see how your message will look to your customer.
Step 6: Send SMS
Hit the send button to send the SMS. Ensure you are connected to the web. You should receive a confirmation message from SMSCountry. You can also schedule the SMS to be sent at a later time.
Now head back to the SMSCountry dashboard to check the reports.
Generating reports
Step 1: Define your requirements
Identify which data points you want to include in your report.
For example, if you want to create a report about deliveries, you may add delivery methods, delivery times, delivery operators, delivery dates and delivery locations.
Step 2: Create a Report sheet
Always create a separate sheet in your Excel workbook for your reports. You can merge different reports on the same sheet; refrain from adding reports to your main data sheets.
Step 3: Use formulas
Use formulas like “SUM”, “AVERAGE”, “COUNT”, “VLOOKUP”, and “LOOKUP to aggregate, summarise and display data based on specified criteria. You can also display total orders, payments received, pending payments, average delivery times and order fulfilment rates.
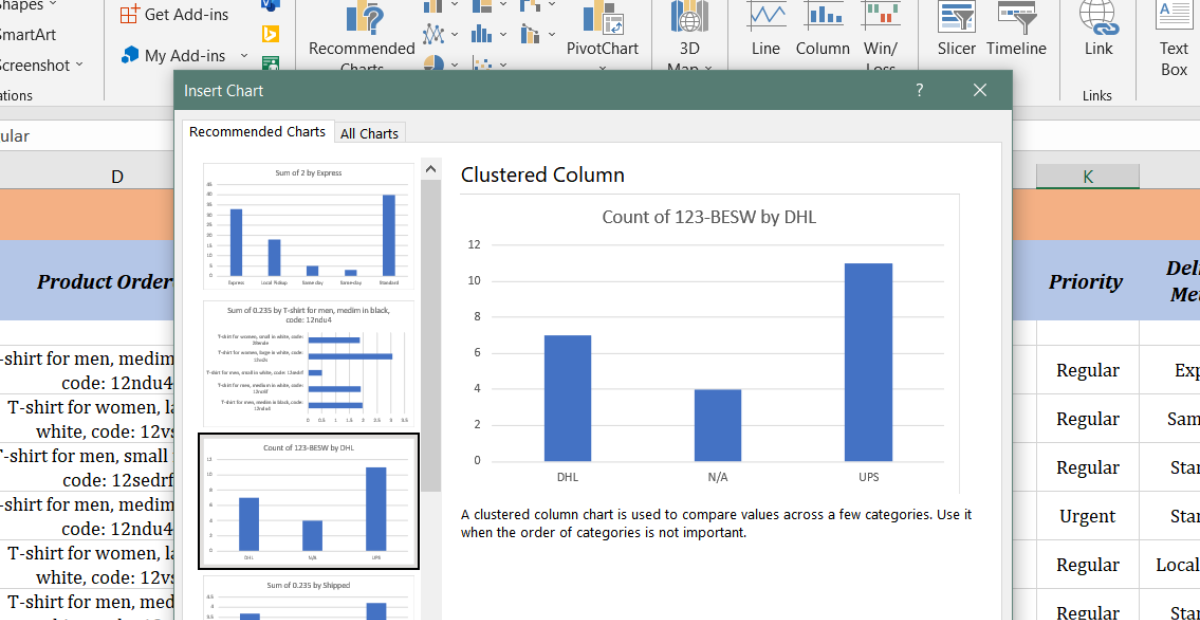
Step 4: Add charts and graphs
Visuals make things easier to understand. Choose appropriate graphs from the “Charts” section on the “Insert” tab to create a view of your data.

Step 5: Format the report
Lastly, format the report for readability and presentation. Use font styles, colours and cell borders to highlight important information or visualise data trends.
Scale your business with a spreadsheet and SMS
There you have it.
Now you can start your own customer tracking spreadsheet in Excel and manage orders and deliveries without worrying.
Once you get your database up, scale it further by keeping your customers informed. We recommend SMSCountry as your SMS partner.
SMSCountry SMS plugin keeps customers updated on delivery status, from payment to complete delivery, anywhere in the world. It’s fast, reliable and is backed by an army of customer support to help you delight your customers.
Schedule a demo or sign-up and try out the platform yourself.


